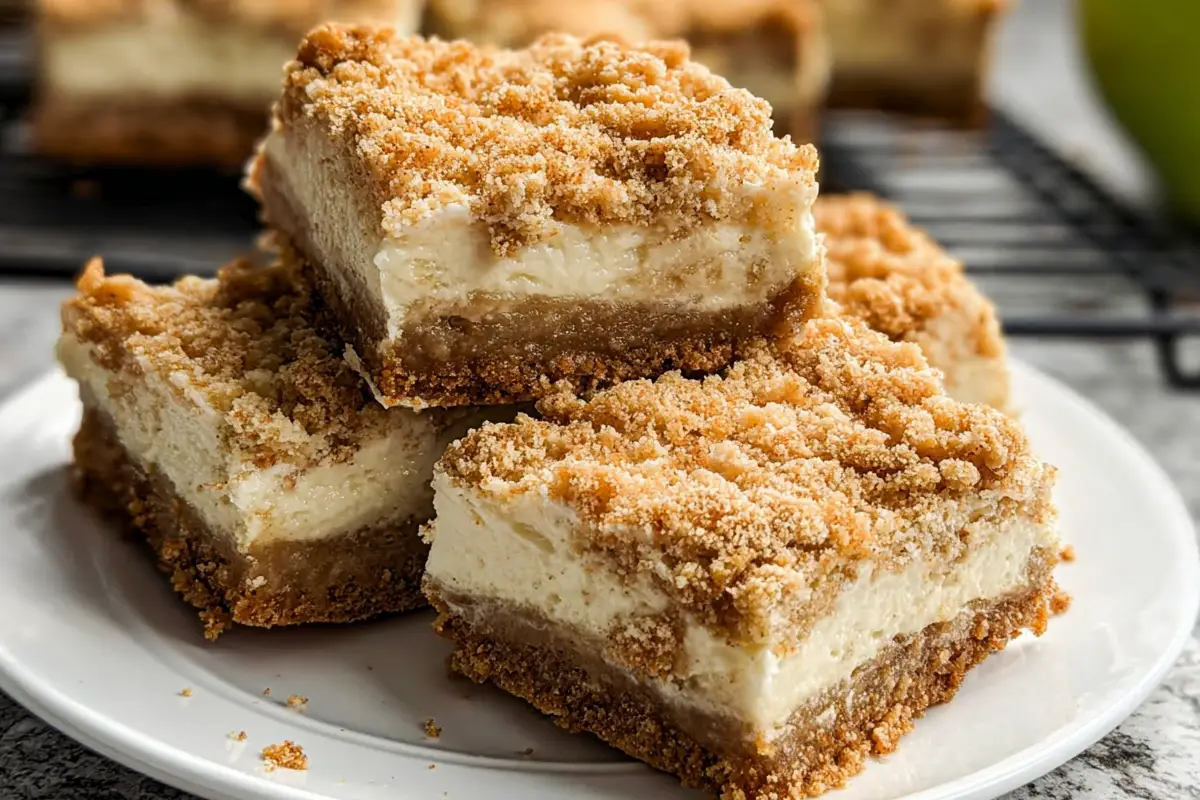
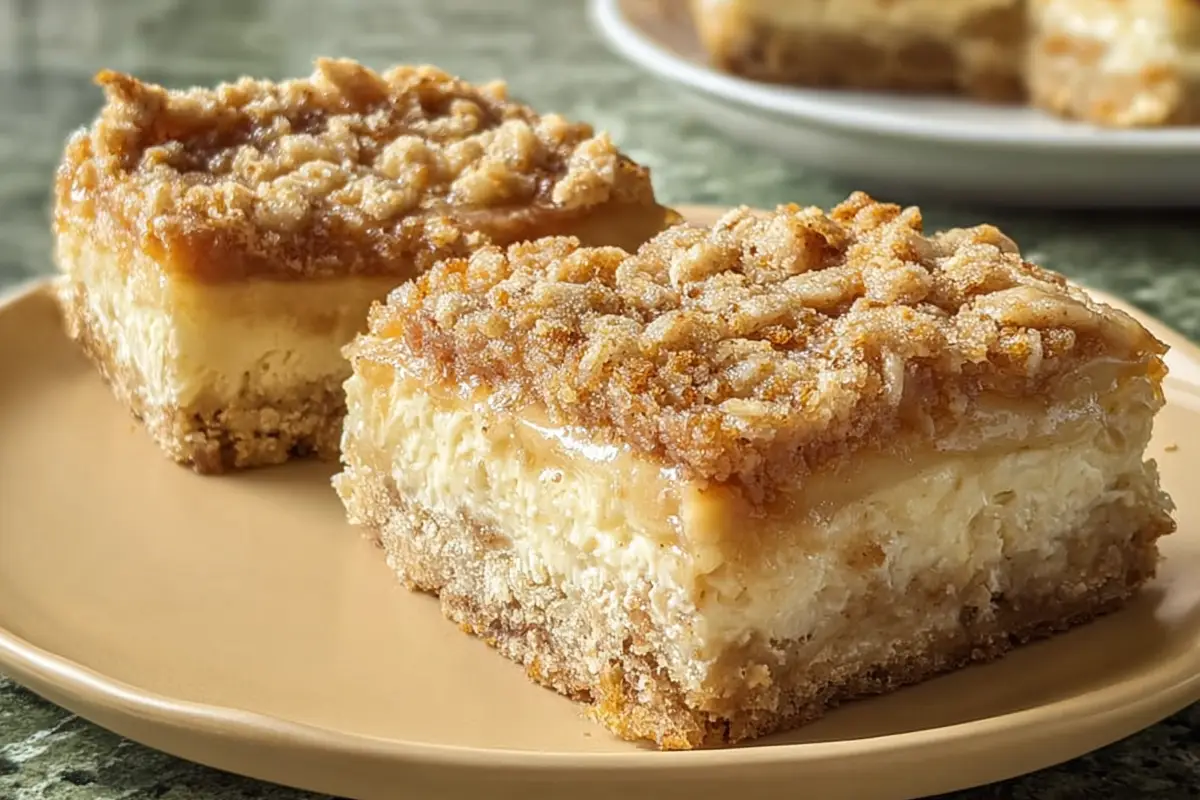
- Three-layer treat: buttery shortbread crust, creamy cheesecake layer, and cinnamon-sugar apple crumble topping.
- Easy and make-ahead friendly: simpler than full cheesecake and improves after chilling overnight.
- Pro tips: use room-temp cream cheese, tart apples (Granny Smith/Honeycrisp), chill before slicing, line pan with parchment.
- Highly customizable: gluten-free, vegan, caramel or pumpkin variations, and nut or fruit mix-ins.
Last Updated on November 14, 2025 by Souhail
There’s just something magical about the combination of apples and cheesecake, especially when fall rolls around—or honestly, any time you’re craving a warm, cinnamon-spiced treat. These apple cheesecake bars are my go-to when I want to serve something that feels both comforting and impressive. With a buttery shortbread crust, a luxuriously creamy cheesecake layer, and sweet-tart apples baked into a brown sugar-cinnamon topping, every bite is a little moment of joy.
I first made these for a cozy Friendsgiving a few years back, and let’s just say they were gone before the turkey. They’re perfect for holidays, potlucks, or a weekend baking project when you’re in the mood to fill your home with the scent of cinnamon apples. The best part? They’re way easier than making a full cheesecake, but just as satisfying.
Table of contents
- Here’s Why You’ll Keep Coming Back to These Apple Cheesecake Bars
- Want to switch it up? Try these easy variations:
- How To Make it
- Pro Tips to Make These Apple Cheesecake Bars Absolutely Perfect
- Delicious Twists: How to Make These Bars Your Own
- How to Serve These Apple Cheesecake Bars (Because Presentation Counts!)
- Storing & Reheating Tips to Keep ‘Em Tasting Fresh
- Creative Ways to Reuse These Bars (If You Have Leftovers!)
- FAQs About Apple Cheesecake Bars
- Try It, Share It, Love It
Here’s Why You’ll Keep Coming Back to These Apple Cheesecake Bars
There are a lot of dessert bars out there—but these apple cheesecake bars? They hit that sweet spot (literally and figuratively) between nostalgic and decadent. Here’s what makes them so irresistible:
- Three luscious layers: A buttery shortbread crust, smooth vanilla cheesecake, and cinnamon-sugar apples with a golden crumble on top. Each layer brings texture and flavor.
- Perfect balance of flavors: The tangy cream cheese cuts through the sweetness of the apples and brown sugar, while warm spices like cinnamon and nutmeg make the whole thing feel like a fall hug.
- Easier than traditional cheesecake: No springform pan. No water bath. Just a baking dish, a few simple layers, and the same creamy satisfaction.
- Make-ahead friendly: These bars are even better chilled the next day, which makes them great for holiday prep.
- Totally customizable: Gluten-free? Swap the flour. Want more crunch? Add chopped pecans to the crumble. I’ve got more ideas for you below.
And let’s be real—if you love desserts like pecan pie bars or apple crisp with oats, this one lands right in the middle with a little creamy bonus.
Want to switch it up? Try these easy variations:
- Gluten-Free Version: Use a 1-to-1 gluten-free flour blend in both the crust and the crumble topping.
- Vegan Option: Go for a dairy-free cream cheese (like Kite Hill or Tofutti), vegan butter, and a flax egg for the crust.
- No-Bake Shortcut: Use a graham cracker crust and skip baking the base. It won’t hold quite the same, but it’s a good option for hot summer days.
- Extra Nutty: Fold some chopped walnuts or pecans into the apple topping or sprinkle on top of the crumble before baking.
How To Make it
Apple Cheesecake Bars Recipe
A cozy and creamy apple dessert bar with buttery crust, spiced apples, and rich cheesecake. These apple cheesecake bars are the perfect treat for fall or holidays!
16
servings25
minutes40
minutes320
kcalKeep the screen of your device on
Ingredients
- For the Crust:
2 cups all-purpose flour
0.5 cup granulated sugar
1 cup unsalted butter, melted
0.25 tsp salt
- For the Cheesecake Layer:
16 oz cream cheese, softened
0.5 cup granulated sugar
2 large eggs
1 tsp vanilla extract
- For the Apple Topping:
2.5 cups peeled and diced apples (about 3 medium apples)
0.25 cup brown sugar
1 tsp cinnamon
1 tsp lemon juice
- For the Crumble Topping:
0.75 cup all-purpose flour
0.5 cup rolled oats
0.3 cup brown sugar
0.5 tsp cinnamon
6 tbsp unsalted butter, melted
Directions
- Start by preheating your oven to 350°F (175°C) and line a 9×13-inch baking pan with parchment paper. You’ll thank yourself later when you lift the cooled bars out easily for slicing. Now, let’s get into each layer.
- First, make the crust.
- In a medium bowl, mix together flour, sugar, and a pinch of salt. Then, add the melted butter and stir until it forms a crumbly, sandy texture. Press this mixture evenly into the bottom of your prepared pan. Bake it for about 15 minutes—just enough to set it and give it a bit of structure for all the goodness we’re about to layer on top.
- While the crust bakes, work on the cheesecake filling.
- In a large mixing bowl, beat the softened cream cheese until it’s smooth and fluffy. You don’t want any lumps. Add the sugar, vanilla, and eggs, and keep beating until it’s creamy and well-blended. Pour this mixture over the warm crust once it comes out of the oven and smooth it out evenly with a spatula.
- Now for the apple layer.
- Peel, core, and dice your apples (Granny Smiths are great here). Toss them in a bowl with brown sugar, cinnamon, and a squeeze of lemon juice to bring out that sweet-tart apple flavor. Sprinkle the apple mixture evenly over the cheesecake layer.
- Let’s finish it with a crumble topping.
- In a small bowl, mix flour, oats, brown sugar, cinnamon, and melted butter. It should look like damp sand with some chunky bits—that’s what gives us those golden, crispy bites on top. Sprinkle it generously over the apples.
- Now, it’s baking time. Pop the whole thing in the oven for 35–40 minutes, or until the edges are lightly golden and the center is just set. A slight jiggle is okay—it’ll firm up in the fridge.
- Once baked, let it cool at room temperature for about an hour, then refrigerate for at least 3 hours (or overnight) before slicing. It’s worth the wait, I promise.
Notes
- Let the bars chill completely for clean slices and best texture.
- Use tart apples like Granny Smith for a balanced flavor.
- Make it ahead! These bars are even better the next day.
- Add chopped pecans to the crumble for extra crunch.
- Want extra fall flavor? Add a pinch of nutmeg or allspice to the apple topping.
- For easier slicing, run a knife under warm water between cuts.
Nutrition Facts
- Calories: 320kcal
- Fat: 20g
- Saturated Fat: 12g
- Cholesterol: 70mg
- Sodium: 115mg
- Carbohydrates: 32g
- Fiber: 1g
- Sugar: 19g
- Protein: 4g
Like this recipe?
Follow @wikitasty on Pinterest
Pro Tips to Make These Apple Cheesecake Bars Absolutely Perfect
Baking bars might seem foolproof, but these little tips can make the difference between good and can-I-have-another- great.
- Don’t skip the chill time: It might be tempting to cut into these right away (I get it), but letting them set in the fridge is what gives you those clean, creamy layers.
- Room temp cream cheese is key: Cold cream cheese = lumps. For that silky cheesecake texture, let it sit out for at least 30 minutes.
- Use tart apples: Granny Smith or Honeycrisp are my top picks. The tartness balances all the sweetness and keeps the topping from getting mushy.
- Line your pan with parchment: This makes lifting and slicing the bars so much easier—and your dish stays clean.
- Add a squeeze of lemon to the apples: It brightens up the topping and keeps the apples from browning too fast.
These tips will also help if you want to get creative with something like marbled pumpkin cheesecake—another dessert bar that benefits from layering, chilling, and balancing flavors.
Delicious Twists: How to Make These Bars Your Own
While the original version is a classic, these bars are super versatile. Here are a few fun and flavorful ways to play around:
1. Caramel Apple Cheesecake Bars
Drizzle the top with salted caramel after baking. Let it set in the fridge for a glossy, gooey upgrade.
2. Pumpkin Apple Cheesecake Bars
Add ½ cup of pumpkin purée and a pinch of pumpkin pie spice to the cheesecake layer. It gives fall vibes similar to these pumpkin cheesecake muffins.
3. Apple-Pear Blend
Mix chopped apples with diced pears for a little extra depth and sweetness in the fruit topping.
4. Spiced Apple Chai Bars
Add ground cardamom and ginger to the apple topping for a chai twist. It’s fragrant, cozy, and super unique.
5. Cranberry-Apple Cheesecake Bars
Fold in a handful of fresh or dried cranberries with the apples for a pop of tartness and gorgeous color.
How to Serve These Apple Cheesecake Bars (Because Presentation Counts!)
These bars are best served chilled or at room temperature, depending on your preference. I love slicing them into clean squares and giving them a little ta-da moment:
- Top with whipped cream or vanilla bean ice cream for an extra-indulgent treat.
- Garnish with a drizzle of caramel sauce and a dusting of cinnamon or powdered sugar.
- Serve with a mug of spiced cider or chai tea for the ultimate cozy pairing.
- Add crushed pecans on top before serving for a bit of crunch and flair.
They’d also look beautiful as part of a fall dessert board alongside pumpkin cheesecake and mini pies.
Storing & Reheating Tips to Keep ‘Em Tasting Fresh
These bars are awesome for making ahead, and they keep well if stored properly.
- Fridge: Store in an airtight container in the fridge for up to 5 days. The flavor actually deepens over time.
- Freezer: Wrap bars individually in plastic wrap and place in a zip-top bag or airtight container. Freeze for up to 2 months. Thaw overnight in the fridge before serving.
- Reheating: These are best served chilled, but if you want them warm, pop a slice in the microwave for 10-15 seconds. Just note the texture will soften a bit.
Creative Ways to Reuse These Bars (If You Have Leftovers!)
If you somehow don’t eat them all (respect), here are a few genius ideas:
- Crumble into a trifle: Layer with whipped cream and extra cinnamon apples for an easy dessert parfait.
- Apple cheesecake milkshake: Blend a bar with vanilla ice cream and milk. Yes, it’s dessert within dessert.
- French toast topping: Chop up a bar and warm it slightly to spoon over French toast or pancakes.
- Cheesecake “french toast”: Sandwich a bar between slices of bread, dip in egg mixture, and cook like stuffed French toast.
FAQs About Apple Cheesecake Bars
Absolutely! They’re even better after chilling overnight. Just keep them covered in the fridge until you’re ready to serve.
Yes. Because of the cream cheese filling, these should always be stored in the fridge. They’ll stay fresh for about 4–5 days.
Yes! Freeze individual bars wrapped in plastic and then in a container. Thaw overnight in the fridge before serving.
The center should be slightly jiggly but not liquid. The edges should look set and lightly golden. It firms up completely when chilled.
Tart apples like Granny Smith or Honeycrisp are ideal—they hold their shape and balance the sweetness of the cheesecake.
You can, but fresh apples offer better texture and flavor. If using canned filling, reduce the sugar and skip the lemon juice.
Try It, Share It, Love It
If you give these Apple Cheesecake Bars a try, I’d love to hear how they turn out! Leave a comment below, or tag me on Instagram with your beautiful bars. Whether you’re baking for the holidays or just because it’s a Tuesday and you need something sweet, these bars are sure to bring a little comfort and joy to your kitchen.