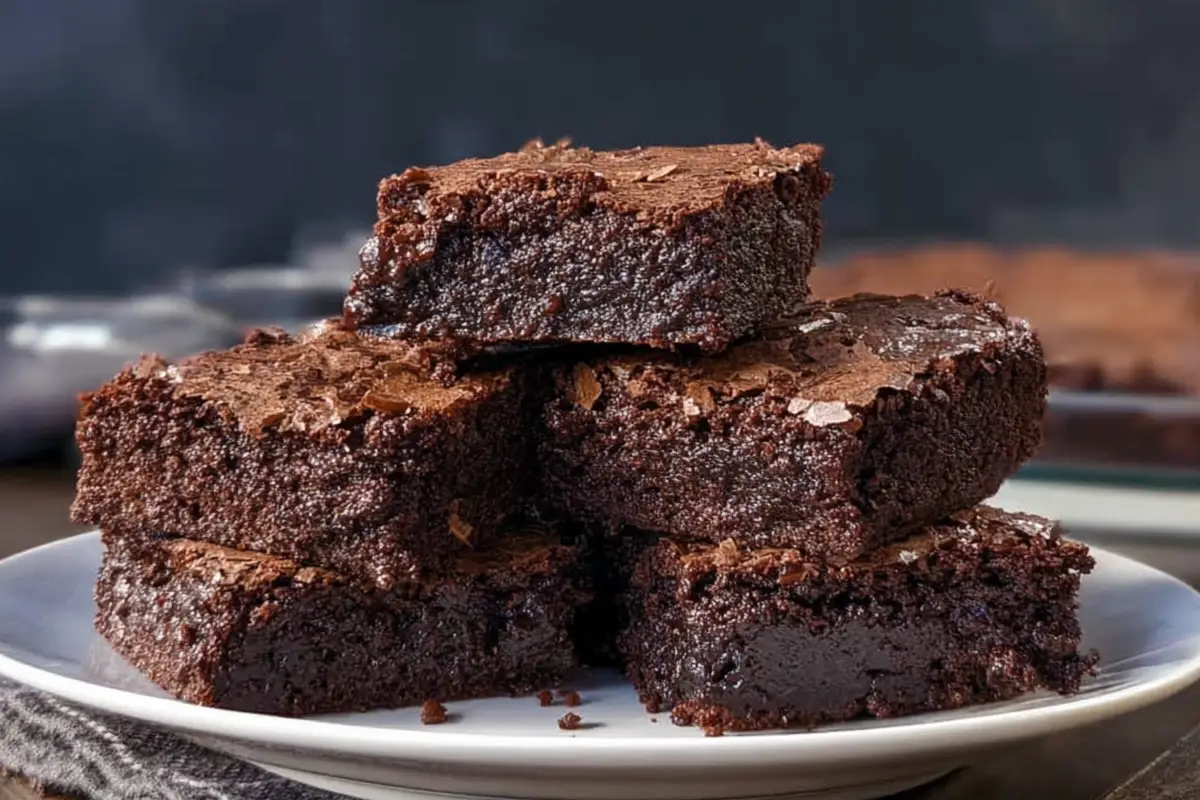
- Deeply chocolatey brownies with fudgy centers, chewy edges, and crackly tops deliver an irresistible chocolate fix.
- One-bowl, no-mixer recipe that’s quick to make and ideal for weeknight baking or serving at gatherings.
- Use quality cocoa, avoid overmixing, line the pan, and slightly underbake for gooey, clean slices.
- Highly customizable: gluten-free, dairy-free, nutty, peanut butter swirl, salted caramel, or espresso boost.
- Store airtight up to 4 days, freeze for 2 months, and briefly microwave to reheat for warm, gooey brownies.
Last Updated on December 27, 2025 by Souhail
Okay, I’m going to say it: this brownies recipe is the one I turn to every time I need a chocolate fix that feels a little extra, but doesn’t take hours or a mixer to make. It’s deeply chocolatey, has those irresistible crackly tops, and walks that perfect line between fudgy and chewy. I mean, who doesn’t love biting into a still-warm brownie with melty chocolate pockets and a hint of sea salt?
The best part? These brownies are the definition of cozy, everyday indulgence. They’re simple enough to throw together on a random Wednesday night, yet rich enough to serve at a dinner party or give as a gift. Whether you love your brownies with a scoop of vanilla ice cream or just a tall glass of cold milk, this recipe is about to become your go-to.
Let’s talk flavor for a sec: think intense cocoa richness, warm vanilla undertones, and that satisfying bite from a perfect bake. They’re not too sweet, and they don’t need frosting, though no judgment if you’re into that. These brownies shine all on their own.
Table of contents
- Why You’ll Love These Brownies (They’re That Good)
- How To Make This Brownies Recipe
- Here’s How to Nail These Brownies Every Single Time
- Make It Your Way: Brownie Variations to Try
- Delicious Ways to Serve These Brownies
- How to Store and Reheat Your Brownies Like a Pro
- Other Fun Ways to Use These Brownies
- FAQs About This Brownies Recipe
- Let’s Wrap It Up!
Why You’ll Love These Brownies (They’re That Good)
There’s just something magic about a really good homemade brownie. Here’s why this one stands out from the rest:
- Fudgy center, chewy edges, and crackly tops — it’s the holy trifecta of brownie texture.
- No mixer needed and only one bowl to clean. Perfect for lazy bakers (hi, it’s me).
- Cocoa powder + chocolate chips give you double the chocolate intensity.
- Customizable for everyone — gluten-free, nutty, or dairy-free versions are all super easy.
- Quick bake time (under 30 minutes), which means your chocolate cravings are satisfied fast.
Want to make them gluten-free? Just sub in a 1:1 gluten-free flour blend. Prefer dairy-free? Use plant-based butter and dairy-free chocolate chips — easy peasy. Oh, and if you love a salty-sweet combo, don’t skip the sea salt sprinkle on top. It adds chef’s kiss perfection.
How To Make This Brownies Recipe

Brownies Recipe
16
servings10
minutes25
minutes230
kcalThese rich, chewy brownies are bursting with deep chocolate flavor, crackly tops, and gooey centers. Whether you’re baking for a cozy night in or sharing with friends, this brownies recipe delivers bakery-quality results every time.
Keep the screen of your device on
Ingredients
0.5 cup (113g) unsalted butter, melted
0.75 cup (150g) granulated sugar
0.25 cup (50g) brown sugar, packed
2 large eggs
1 tsp vanilla extract
0.5 cup (48g) unsweetened cocoa powder
0.5 cup (64g) all-purpose flour
0.25 tsp salt
0.5 cup (90g) semi-sweet or dark chocolate chips
Optional: flaky sea salt for topping
Directions
- Start by preheating your oven to 350°F (175°C). Line an 8×8-inch square baking pan with parchment paper, leaving a bit of overhang on the sides so you can lift the brownies out easily once they’re cooled.
- In a medium-sized, microwave-safe bowl, melt your unsalted butter. I usually go for about 45 seconds to 1 minute, depending on your microwave. You want it fully melted but not sizzling hot.
- Once the butter’s melted, whisk in the granulated sugar and brown sugar until smooth and glossy — it should look almost creamy. This step helps give the brownies that signature crackly top.
- Now, stir in the eggs one at a time, mixing well after each addition. Then add your vanilla extract and give it another good stir. It should smell amazing already.
- Time for the cocoa powder! Sift it in to avoid lumps (trust me, it’s worth it), and mix it until everything looks dark and dreamy. You’ll start to feel the batter thicken up — that’s a good sign.
- Add the flour and salt next, and here’s the important part: mix just until you can’t see any more dry flour. Overmixing can make brownies tough, and we want them soft and fudgy.
- Finally, fold in the chocolate chips. You can use semi-sweet, dark, or a combo — whatever you like best. Save a handful to sprinkle on top before baking if you’re feeling fancy.
- Pour the batter into your prepared pan and smooth out the top with a spatula. If you saved some chips, sprinkle them over now. You can also add a tiny pinch of flaky sea salt on top if you’re into that sweet-salty combo (I always am!).
- Bake for 25–28 minutes, until the center is just set and a toothpick inserted comes out with a few moist crumbs — not completely clean. They’ll continue to set as they cool, which is how you get that fudgy texture.
- Let the brownies cool in the pan for at least 20–30 minutes before lifting them out. If you can wait longer, even better. Slice into squares and try not to eat the entire tray in one sitting. I believe in you.
Notes
- Dutch-process cocoa gives a deeper flavor, but natural cocoa works too.
- Don’t overmix once the flour is added — it keeps the brownies soft.
- Letting them cool fully helps them slice cleanly (but warm brownies are still the best).
- Add a swirl of peanut butter or Nutella before baking for an extra twist.
- These freeze beautifully — perfect for make-ahead treats.
- Sprinkle sea salt on top before baking for a sweet-and-salty combo.
Nutrition Facts
- Calories: 230kcal
- Fat: 12g
- Saturated Fat: 7g
- Sodium: 75mg
- Carbohydrates: 30g
- Fiber: 2g
- Sugar: 22g
- Protein: 2.5g
Like this recipe?
Follow @wikitasty on Pinterest
Here’s How to Nail These Brownies Every Single Time
Let’s talk tips, because while this recipe is super forgiving, a few little tricks will help you hit that perfect brownie texture.
- Use good cocoa powder. It’s the main flavor, so skip the cheap stuff. I usually use Dutch-processed cocoa for a deeper flavor.
- Don’t overmix once you add the flour. This keeps the texture tender and fudgy, not cakey.
- Line your pan with parchment paper. It makes removing (and slicing!) way easier — no sticking, no breaking.
- Slightly underbake. That’s the secret to gooey centers. They’ll keep baking as they cool.
- Cool completely before cutting. I know, it’s torture. But if you want clean, Instagrammable slices, let them set up first.
And if you’re craving more chocolatey treats, definitely check out these soft-baked pumpkin chocolate chip cookies — they’re cozy fall vibes all year long.
Make It Your Way: Brownie Variations to Try
Brownies are incredibly adaptable. Once you’ve mastered the base recipe, here are a few fun twists to try:
1. Nutty Brownies
Add ½ cup of chopped walnuts, pecans, or almonds to the batter. They bring crunch and richness that balances the fudgy texture.
2. Peanut Butter Swirl
Drop spoonfuls of peanut butter on top of the brownie batter and swirl with a knife. It’s like a baked version of your favorite peanut butter cookies meets brownies — totally addictive.
3. Salted Caramel Brownies
Drizzle caramel sauce over the batter before baking and finish with flaky sea salt. It turns your basic brownie into a decadent dessert.
4. Espresso Boost
Add 1 tsp of instant espresso powder to enhance the chocolate flavor — you won’t taste coffee, but the richness will be next level.
5. Gluten-Free Version
Use a gluten-free 1:1 flour blend. The fudgy texture means no one will even know the difference.
Delicious Ways to Serve These Brownies
These brownies are fabulous on their own, but if you’re serving guests (or just want to elevate things), here are a few dreamy ideas:
- Warm with a scoop of vanilla ice cream and a drizzle of chocolate sauce.
- Cut into small squares and serve as part of a dessert platter — maybe next to something like Neapolitan cake for variety.
- Crumbled into a sundae or layered in a trifle for extra drama and texture.
They also make a perfect lunchbox treat or sweet surprise in a care package.
How to Store and Reheat Your Brownies Like a Pro
Brownies keep super well, and they taste even better the next day (if you have any left, that is!).
- Store: Keep them in an airtight container at room temp for up to 4 days.
- Freeze: You can freeze them in a single layer for up to 2 months. Wrap each square in plastic wrap, then store in a freezer bag.
- Reheat: A quick 10–15 seconds in the microwave makes them warm and gooey again.
Pro tip: microwave with a damp paper towel to keep the edges from drying out.
Other Fun Ways to Use These Brownies
Beyond just eating them by the square (which is totally legit), here are some creative brownie upgrades:
- Brownie sundae bar: Set up toppings and let everyone DIY their own masterpiece.
- Ice cream sandwiches: Slice brownies in half and fill with your favorite ice cream.
- Crumble into granola: Sounds wild, but a sprinkle of brownie bits over this vanilla granola is an unexpectedly good treat.
FAQs About This Brownies Recipe
It comes from whisking the butter and sugars really well and using melted butter. That glossy batter = perfect tops!
Yes! They should be just set in the center. Slightly underbaking ensures a fudgy, not cakey, texture.
Dutch-process gives a richer, darker flavor, but unsweetened natural cocoa also works. Avoid sweetened cocoa mix.
Absolutely! The chips are optional. You’ll still get deep chocolate flavor from the cocoa powder.
The edges should look set, and a toothpick inserted in the center should come out with moist crumbs (not wet batter).
Yes! Just double all the ingredients and bake for 30–35 minutes. Keep an eye on the center.
Let’s Wrap It Up!
There’s just something joyful about baking brownies from scratch. It’s cozy, nostalgic, and totally satisfying — and this brownies recipe is proof that homemade is always worth it. I hope this becomes your new go-to treat whenever the chocolate cravings strike!
If you make these brownies, I’d love to see how they turned out! Leave a comment below or tag me on social so we can drool over gooey slices together.
And if you’re still in the mood to bake, check out my other favorite recipes like peanut butter cookies or that dreamy Neapolitan cake.
Happy baking, friend!