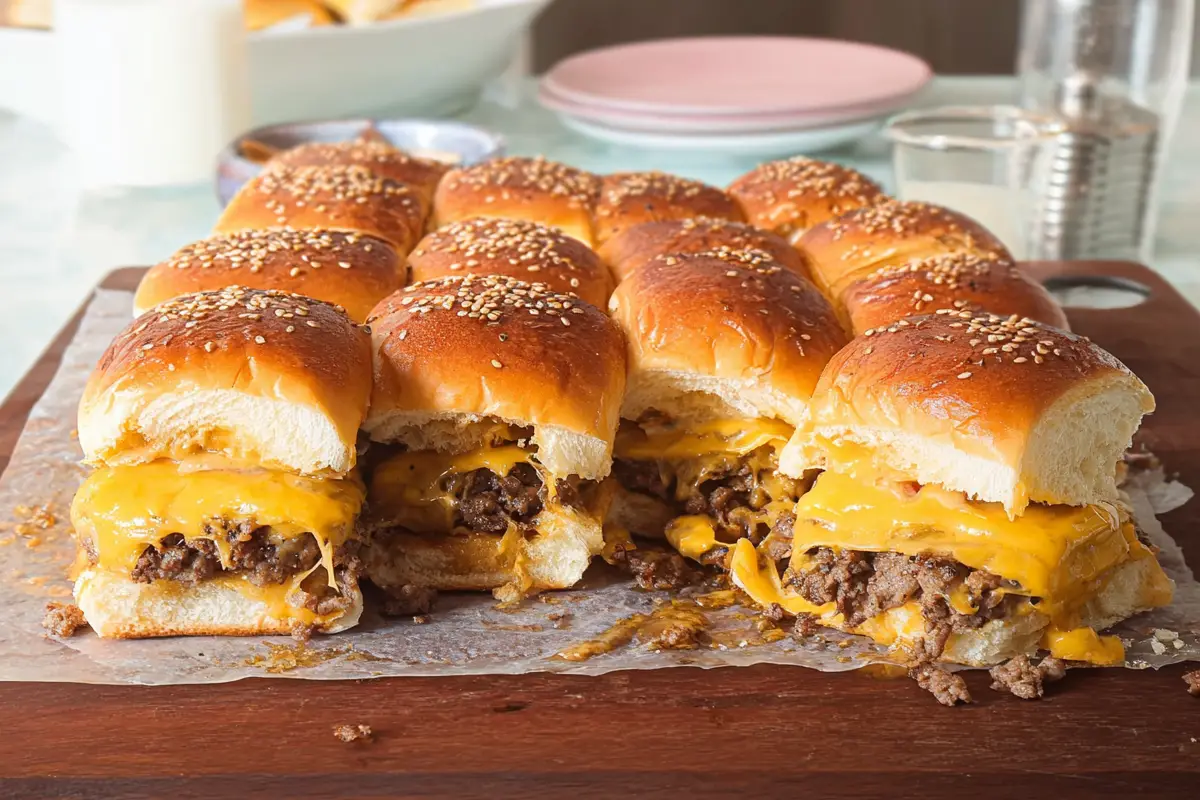
- Bake beef in one layer to avoid flipping and get consistent juicy, cheesy sliders with minimal fuss.
- Brush buns with buttery topping and sesame seeds for a golden, toasty finish and extra flavor.
- Drain cooked beef to prevent soggy sliders; use soft pull-apart rolls like Hawaiian for easy assembly.
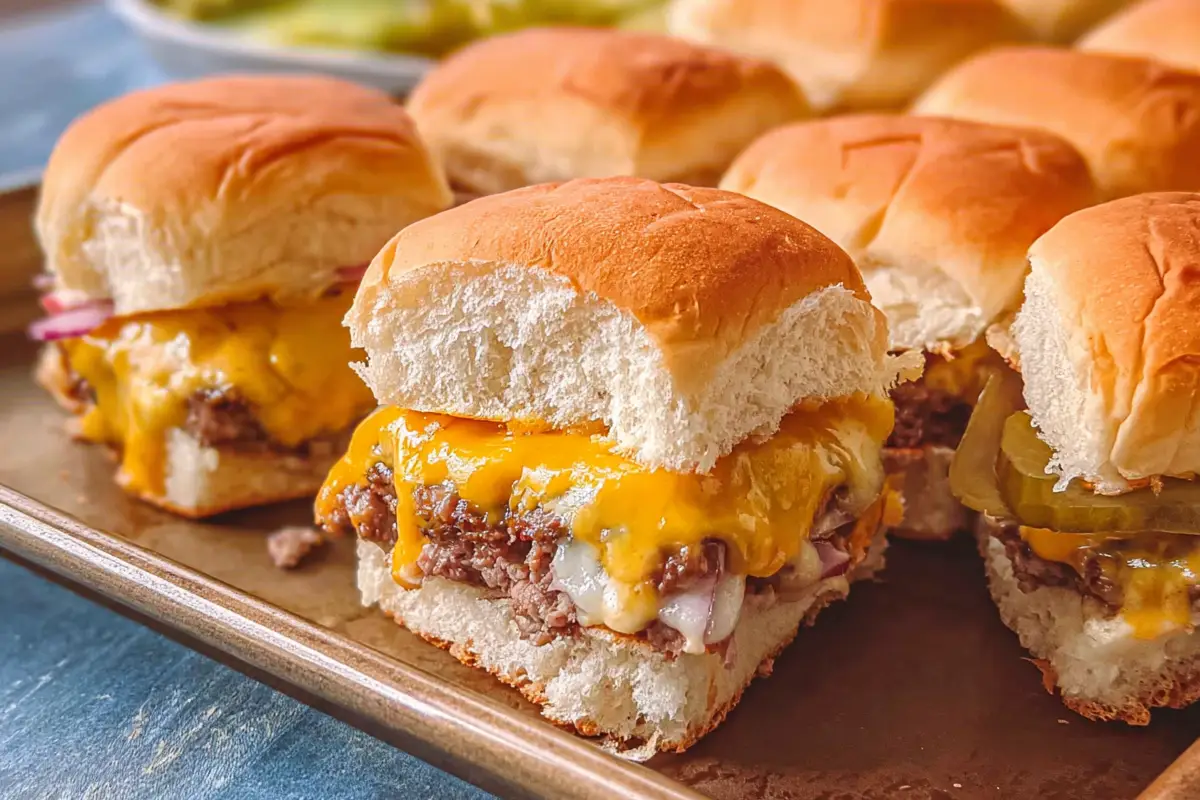
- Customize with variations like bacon, caramelized onions, or jalapeños and serve hot for best results.
Last Updated on December 27, 2025 by Souhail
There’s just something undeniably fun about sliders. I still remember the first time I brought out a tray of cheeseburger sliders at a backyard BBQ, they vanished in minutes, and people were hovering around the kitchen waiting for the next batch. Mini but mighty, these sliders pack all the juicy, cheesy, pickle-y goodness of a classic cheeseburger in a snackable size.
Whether you’re feeding a crowd during game day, hosting a birthday party, or just want a quick dinner that makes everyone happy, these cheeseburger sliders are always a win. The best part? They’re baked in the oven all at once, meaning minimal fuss and maximum flavor. With melty cheese, buttery toasted buns, and that perfect blend of savory beef and burger toppings, these little bites of joy will disappear faster than you can say “pass the ketchup!”
Table of contents
- Why These Cheeseburger Sliders Are So Darn Good
- How To Make Cheeseburger Sliders
- My Best Tips for Juicy, Cheesy, Crowd-Pleasing Sliders Every Time
- Make It Your Way: Fun Variations to Try
- What to Serve with Cheeseburger Sliders
- How to Store & Reheat Leftover Sliders
- Get Creative with Leftovers
- FAQs About Cheeseburger Sliders
- Give This Recipe a Try!
Why These Cheeseburger Sliders Are So Darn Good
Let’s be real — burgers are always a vibe. But when you take that crave-worthy classic and miniaturize it into cute, bite-sized sliders? Total game changer. Here’s why this recipe works like a charm every single time:
- No Flipping Required: We bake the beef in one layer, meaning no standing over a skillet flipping individual patties. You get all the burger flavor without the fuss.
- Perfect for a Crowd: Whether you’re throwing a game day party (and you should totally serve these with game day nachos) or just feeding hungry teens, this recipe scales easily.
- Built-In Melty Cheese: The sliders bake with cheese already melted on top — no need to assemble after the fact.
- Buttery Topping: A brushed-on butter topping with sesame seeds takes these over the top, adding a golden, toasty finish to each bite.
- Customizable Fillings: From classic American cheese and pickles to spicy mustard and sautéed onions, you can make these your own.
Oh, and if you’re looking for more beefy snacks, you might love these beef sausage balls too!
How To Make Cheeseburger Sliders
Cheeseburger Sliders Recipe
Juicy, cheesy, and baked to perfection, this cheeseburger sliders recipe is your go-to for parties, game day, or easy weeknight dinners.
12
servings15
minutes20
minutes310
kcalKeep the screen of your device on
Ingredients
1.5 lb ground beef
1 pack (12 count) Hawaiian sweet rolls
8 slices American cheese (or cheddar)
Salt and pepper to taste
0.5 tsp garlic powder (plus more for butter mixture)
3 tbsp unsalted butter, melted
1 tsp sesame seeds
Optional: sliced pickles, ketchup, mustard, sautéed onions
Directions
- Start by preheating your oven to 375°F (190°C). While that’s heating up, grab a 9×13-inch baking dish and give it a quick spray with cooking spray or lightly grease it with butter. This helps everything come out easily once baked.
- In a skillet over medium heat, cook 1.5 pounds of ground beef. Break it up with a spatula and stir it occasionally until it’s fully browned and cooked through. Season with salt, pepper, and a little garlic powder if you like. Once it’s cooked, drain any excess fat so your sliders don’t get soggy.
- Now, slice a 12-pack of Hawaiian rolls in half horizontally — keep them attached, so you have one big top and one big bottom. Place the bottom half in your baking dish.
- Spread the cooked ground beef evenly over the bottom buns. Then layer on about 8 slices of American cheese (or your favorite melty cheese like cheddar or pepper jack). Make sure the cheese covers the meat fully — don’t be shy!
- Place the top half of the buns on top to sandwich everything together.
- In a small bowl, melt 3 tablespoons of butter and mix in ½ teaspoon garlic powder and 1 teaspoon sesame seeds. Brush this glorious mixture all over the tops of the buns until they’re coated and glossy.
- Cover the baking dish with foil and bake for 15 minutes. Then remove the foil and bake for another 5 minutes until the tops are golden and slightly crisp.
- Once they’re out of the oven, let the sliders cool for about 5 minutes. Use a sharp knife to cut between the rolls, and serve warm with pickles, ketchup, mustard, or whatever toppings your heart desires.
Notes
- You can use leaner ground beef (90/10) to reduce grease but still get that rich flavor.
- Feel free to swap the cheese based on your favorite — provolone, Swiss, or pepper jack all work great.
- For extra flavor, add a layer of sautéed onions or a smear of burger sauce under the cheese.
- Don’t skip the butter topping — it gives the sliders that bakery-style finish.
- Make them ahead! Assemble everything, refrigerate, then bake just before serving.
Nutrition Facts
- Calories: 310kcal
- Fat: 18g
- Sodium: 520mg
- Carbohydrates: 21g
- Fiber: 1g
- Sugar: 4g
- Protein: 17g
Like this recipe?
Follow @wikitasty on Pinterest
My Best Tips for Juicy, Cheesy, Crowd-Pleasing Sliders Every Time
Making these cheeseburger sliders isn’t hard at all, but a few pro tips will help you nail it every time:
- Don’t overwork the beef. When pressing it into the pan, keep it loose and even. Over-packing can make the meat tough.
- Drain the beef after baking. This is key to avoiding soggy sliders. Use a spatula to lift the cooked beef and tilt the pan to drain excess grease.
- Use soft slider buns. Hawaiian rolls work beautifully, but any soft dinner roll will do. Slice them as a whole slab to make assembly a breeze.
- Brush with butter generously. That golden, glossy top? It comes from melted butter, a touch of garlic powder, and sesame seeds. Game changer.
- Serve warm! These taste best hot from the oven. If you’re prepping in advance, reheat in foil for about 10 minutes to bring back the melty magic.
Make It Your Way: Fun Variations to Try
Once you’ve made these cheeseburger sliders the classic way, you’ll definitely want to get creative. Here are a few fun twists to consider:
BBQ Bacon Cheeseburger Sliders
Swap ketchup and mustard for barbecue sauce, and add a layer of crispy cooked bacon before the cheese. That smoky, sweet tang pairs perfectly with cheddar.
Caramelized Onion Sliders
Cook up some sweet caramelized onions and layer them between the beef and cheese for a rich, savory twist that adds serious depth.
Spicy Jalapeño Sliders
Add sliced pickled jalapeños and pepper jack cheese for sliders with a kick. Drizzle with chipotle mayo for extra heat.
Veggie-Loaded Sliders
Want to sneak in some veggies? Add thinly sliced tomatoes, shredded lettuce, or even a few sautéed mushrooms. Just be sure to pat them dry so your sliders don’t get soggy.
Cheeseburger Dip Sliders
Feeling playful? Make a batch of cheese ball spread or serve these sliders alongside your favorite dip — trust me, people go wild for that combo!
What to Serve with Cheeseburger Sliders
Cheeseburger sliders are super versatile and can be paired with so many tasty sides. Here are a few of my go-to serving ideas:
- Crispy Oven Fries: You can never go wrong with fries, especially with a sprinkle of garlic salt and a side of ketchup or aioli.
- Crockpot Buffalo Chicken Dip: This is a party must-have, and pairs so well with the sliders for a full spread.
- Pickles & Chips: A big bowl of crunchy dill pickles and classic potato chips keeps the burger bar vibe going.
- Vegetable Beef Soup: For a cozy dinner, serve these with a warm bowl of hearty soup.
How to Store & Reheat Leftover Sliders
Let’s be honest — leftovers are rare with these. But if you do have some sliders left, here’s how to keep them fresh:
- To Store: Wrap the sliders in foil or store them in an airtight container in the fridge for up to 3 days.
- To Reheat: Wrap them in foil and bake at 350°F for 10-12 minutes, or until warmed through. Microwaving works too, but they stay crispier in the oven.
Get Creative with Leftovers
If you do manage to stash away a few sliders, here are some fun ways to repurpose them:
- Slider Breakfast Sandwiches: Add a fried egg on top and reheat for a brunch-y twist.
- Slider Crumble Tacos: Chop up leftover sliders and toss the meat into a taco shell with salsa and lettuce.
- Mini Patty Melts: Remove the buns and cook the beef-cheese layer between slices of rye with sautéed onions for a melty twist.
FAQs About Cheeseburger Sliders
Yes! You can fully assemble the sliders, cover them with foil, and store them in the fridge for up to 24 hours. Just bake when ready to serve.
American cheese melts perfectly and gives that classic burger flavor, but you can also use cheddar, pepper jack, or mozzarella.
Not at all! Any soft, pull-apart dinner rolls will work. Just avoid crusty or hard rolls — they won’t give you that melt-in-your-mouth texture.
You can! Wrap them tightly in foil or plastic wrap, freeze for up to 1 month, and reheat in a 350°F oven for 15–20 minutes.
Drain the beef well and avoid wet toppings before baking. Also, bake uncovered for the last 5 minutes to crisp up the tops.
It’s better to serve sauces on the side or add them after baking so the buns don’t get soggy. But a thin layer of burger sauce under the cheese can work well.
Give This Recipe a Try!
I hope you fall in love with these cheeseburger sliders as much as I have. Whether you’re making them for a crowd or just a fun dinner at home, they’re always a hit. Try them out and let me know what you think! Tag me if you post them, or drop a comment to share how they turned out.
If you loved these, you might also enjoy:
Craving more cheesy, melty recipes? Let me know — I’ve got tons to share!