- Comfort-packed bite-sized snack combining savory chili, melty cheddar, and hot dog in flaky buttery pastry.
- Make-ahead friendly: assemble up to 24 hours or freeze unbaked for up to a month; bake from frozen.
- Key technique tips: cool filling, avoid overstuffing, seal edges with egg wash, and rotate pan for even browning.
- Endless variations: swap proteins, add kimchi or southwest mix, or turn into breakfast or vegetarian versions.
Last Updated on March 5, 2026 by Souhail
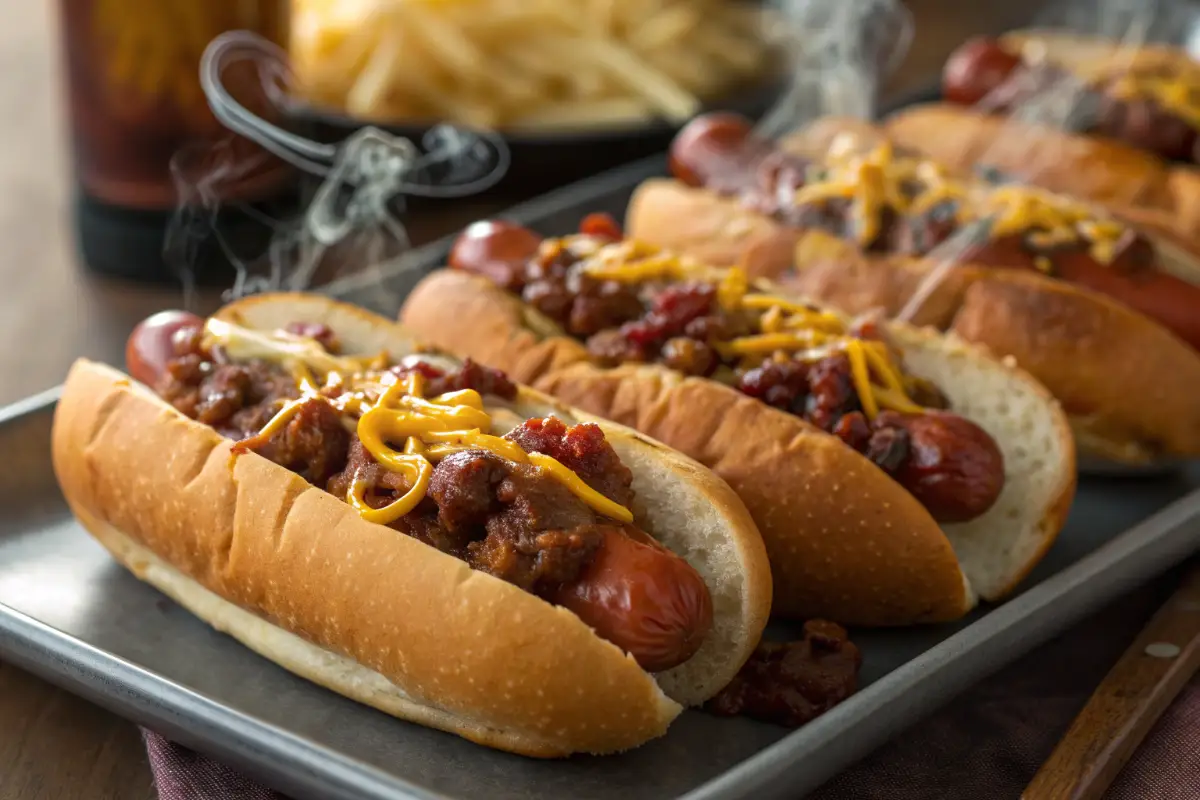
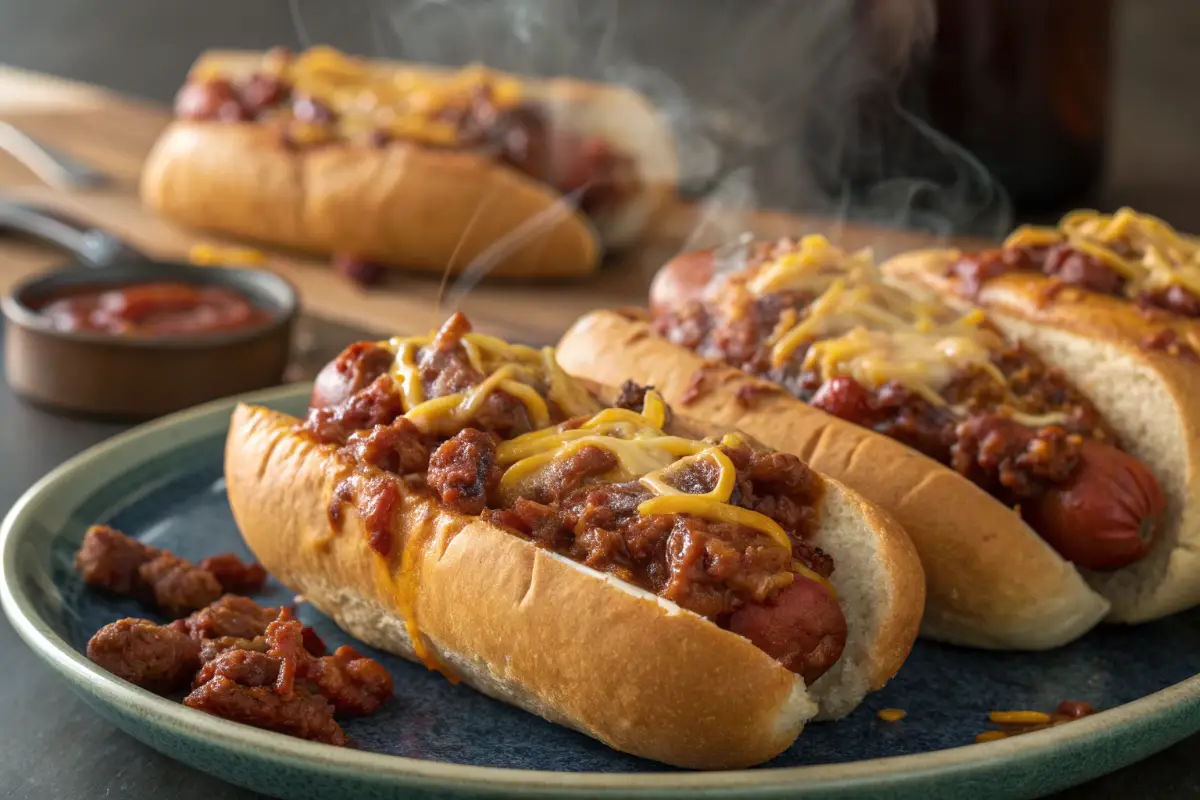
Picture this: it’s a chilly Tuesday night in my tiny New York apartment, friends are crammed onto my couch for board game night, and someone just yelled “snack attack!” That’s exactly when my chili cheese dogs bites save the day. These little handheld wonders pack all the cozy, savory comfort of a classic chili cheese dog into a perfectly bite-sized package that’s way less messy and infinitely more shareable.
Whether you’re hosting a Super Bowl party, prepping for a casual weeknight gathering, or just treating yourself to a fun snack, chili cheese dogs bites fit right into your everyday life with zero fuss. The flavor profile is pure comfort food magic: savory beef chili, melty cheddar cheese, and tender hot dogs wrapped in golden, buttery pastry. What makes this recipe so special is how it transforms a nostalgic favorite into an elegant yet effortless appetizer that disappears fast, no matter the crowd.
Table of contents
- Why You’ll Absolutely Love These Chili Cheese Dogs Bites
- My Go-To Tricks for Perfect Chili Cheese Dogs Bites Every Time
- Fun Twists on the Classic Recipe
- Serving Suggestions
- Storage and Reheating Instructions
- Creative Ways to Enjoy This Recipe
- How Do You Make It
- FAQS
- A Little Story Behind the Bites
- Closing Thoughts
Why You’ll Absolutely Love These Chili Cheese Dogs Bites
Let me tell you, these aren’t your average party snacks. I’ve tested dozens of appetizer recipes in my New York kitchen, and these chili cheese dogs bites keep coming back to the top of my list. Here’s why they work so well:
- All the flavor, none of the mess: No more chasing runaway chili or dealing with floppy buns. Each bite is perfectly contained.
- Customizable heat level: Use mild chili for the kiddos or kick it up with jalapeños for the spice lovers.
- Make-ahead magic: Assemble these up to 24 hours in advance and bake when guests arrive.
- Dietary flexibility: Swap in turkey dogs, use gluten-free puff pastry, or try plant-based chili for easy adaptations.
- Crowd-pleasing appeal: From picky eaters to foodie friends, everyone reaches for seconds.
Want to switch up the chili base? Try my slow-simmered crockpot chili for deeper flavor, or keep it light with a creamy white chicken chili twist. Both work beautifully in these bites!
My Go-To Tricks for Perfect Chili Cheese Dogs Bites Every Time
After burning a few batches while learning the ropes (oops!), I’ve gathered some pro tips that guarantee success:
- Chill your filling: Let the chili cool completely before assembling. Warm filling = soggy pastry.
- Don’t overstuff: A tablespoon of chili and a small piece of hot dog per bite is the sweet spot.
- Seal edges well: Brush pastry edges with egg wash to prevent leaks during baking.
- Use quality cheese: Sharp cheddar melts beautifully and adds that signature tang. Pre-shredded cheese contains anti-caking agents that can affect meltability.
- Rotate your pan: Halfway through baking, rotate the sheet for even golden browning.
- Let them rest: Wait 2-3 minutes after pulling from the oven. The filling is lava-hot!
Fun Twists on the Classic Recipe
While I adore the traditional version, I love experimenting with flavor variations to keep things exciting. Here are my favorite spins:
Southwest Style: Add black beans, corn, and a pinch of cumin to your chili. Top with pepper jack cheese and a tiny dollop of sour cream after baking. This version pairs perfectly with my zesty pumpkin chili for a fall-themed party.
Mediterranean Fusion: Swap beef chili for a lentil-based version with tomatoes, olives, and feta cheese. Use turkey dogs or skip the meat entirely for a vegetarian option that still delivers big flavor.
Breakfast Edition: Use scrambled eggs, crumbled breakfast sausage, and cheddar in place of the chili. Perfect for brunch gatherings or weekend morning treats.
Spicy Kimchi Kick: Add a small spoonful of kimchi to the chili filling and top with mozzarella. The tangy heat creates an unforgettable umami bomb that adventurous eaters will love.
Serving Suggestions
These bites shine on a rustic wooden board with small ramekins of dipping sauces. I like to offer classic yellow mustard, cool ranch, and a smoky chipotle crema. Scatter fresh chives or cilantro on top for a pop of color.
For a complete spread, pair them with crisp celery sticks, carrot coins, and a simple green salad to balance the richness. They’re also fantastic alongside other finger foods like my garlic butter chicken bites for a diverse appetizer table that satisfies every craving.
Storage and Reheating Instructions
Store cooled leftovers in an airtight container in the refrigerator for up to 3 days. To reheat, place on a baking sheet in a 350°F oven for 8-10 minutes until warmed through and crispy. Avoid the microwave if possible, as it can make the pastry soggy. For best results, let them come to room temperature for 10 minutes before reheating.
You can also freeze unbaked assembled bites for up to 1 month. Bake straight from frozen, adding 3-5 minutes to the cooking time.
Creative Ways to Enjoy This Recipe
Don’t limit these to just game day! I’ve served them as a fun dinner alongside soup, packed them in lunchboxes for a special treat, and even brought them to potlucks where they vanished in minutes.
Try slicing them into mini “sliders” for cocktail parties, or deconstruct the recipe into a loaded nacho bar. They’re also amazing crumbled over a baked potato for the ultimate comfort food mashup.
How Do You Make It
Chili Cheese Dogs Bites
24
servings20
minutes18
minutes145
kcalThese easy chili cheese dogs bites pack all the savory, cheesy comfort of a classic dog into a perfectly portable appetizer. Ideal for game day, parties, or a fun weeknight snack!
Keep the screen of your device on
Ingredients
1 sheet puff pastry, thawed (about 17.3 oz)
8 all-beef hot dogs, cut into 0.5-inch pieces
1.5 cups thick chili, cooled
1.5 cups sharp cheddar cheese, shredded
1 large egg, beaten with 1 tablespoon water (for egg wash)
0.25 teaspoon garlic powder
0.125 teaspoon smoked paprika
Optional toppings: diced jalapeños, sour cream, chopped chives, mustard
Directions
- Start by preheating your oven to 400°F and lining two baking sheets with parchment paper.
- Roll out your thawed puff pastry on a lightly floured surface until it’s about 0.125-inch thick.
- Use a round cutter or glass to cut out 24 circles, each about 2.5 inches in diameter.
- Place the circles into a mini muffin tin, gently pressing them into the cups to form little pastry shells.
- In a small bowl, mix your cooled chili with the garlic powder and smoked paprika for an extra flavor boost.
- Spoon about 1 tablespoon of the seasoned chili into each pastry cup.
- Top with a piece of cut hot dog, then sprinkle generously with shredded cheddar cheese.
- Brush the exposed pastry edges with the egg wash to help them turn golden and seal any gaps.
- Bake for 15 to 18 minutes, rotating the pans halfway through, until the pastry is puffed and golden brown and the cheese is bubbly.
- Let them cool in the pan for 2 to 3 minutes before carefully removing them with a small offset spatula.
- Serve warm with your favorite dipping sauces and watch them disappear!
Notes
- For extra-crispy pastry, chill the assembled bites for 10 minutes before baking.
- If your chili is too thin, simmer it uncovered for 10 minutes to thicken before using.
- Vegetarian? Use plant-based hot dogs and a bean-based chili for the same great taste.
- Gluten-free? Swap puff pastry for gluten-free crescent roll dough.
- Make them spicy by adding diced jalapeños or a dash of hot sauce to the chili mixture.
- Double the recipe for large gatherings; they freeze beautifully before baking
Nutrition Facts
- Total number of serves: 24
- Calories: 145kcal
- Fat: 9g
- Saturated Fat: 4g
- Cholesterol: 0.25mg
- Sodium: 0.285mg
- Carbohydrates: 11g
- Fiber: 1g
- Sugar: 1g
- Protein: 5g
Like this recipe?
Follow @wikitasty on Pinterest
FAQS
Absolutely! Assemble them up to 24 hours in advance, cover, and refrigerate. Bake just before serving for the best texture.
Thick, hearty chili is key. If your chili is soupy, simmer it to reduce excess liquid so it doesn’t make the pastry soggy. My crockpot chili recipe
Yes! Just be sure to thaw it completely in the refrigerator overnight before rolling and cutting. Rushing this step can cause the pastry to tear.
Cool the chili completely before assembling, don’t overfill, and bake on the middle rack for even heat distribution. A light brush of egg wash on the bottom of the pastry cup before filling can also create a moisture barrier.
Yes! Freeze unbaked assembled bites on a baking sheet, then transfer to a freezer bag. Bake from frozen, adding 3-5 minutes to the cook time.
You can, but they’ll be larger and require more filling. Adjust baking time to 20-22 minutes and check for golden brown pastry.
A Little Story Behind the Bites
These chili cheese dogs bites were born from a happy accident during a snowy New York winter. I had leftover chili from a batch of my white chicken chili and a package of puff pastry waiting in the fridge.
Instead of reheating the same old meal, I decided to get creative. The first bite was pure magic: flaky, buttery pastry giving way to savory chili, smoky hot dog, and gooey cheese. My friends went wild, and now this recipe is a staple at every gathering I host. It’s comfort food, reimagined for sharing.
Closing Thoughts
There’s something truly special about a recipe that brings people together, and these chili cheese dogs bites do exactly that. They’re easy enough for a Tuesday night treat yet impressive enough for your biggest party. With endless ways to customize and make them your own, I hope this recipe becomes a favorite in your kitchen too.
If you enjoyed these, you might also love exploring my garlic butter chicken bites for another crowd-pleasing appetizer. Now, who’s ready to bake? Grab that puff pastry, and let’s make some magic!