- Three-ingredient recipe: Oreos, cream cheese, and chocolate deliver rich, creamy, no-bake treats.
- No-bake and foolproof: Easy to make without an oven, perfect for beginners and quick prep.
- Endless customizations: Swap flavors, add extracts, toppings, or coatings for seasonal twists.
- Storage-friendly: Refrigerate up to two weeks or freeze up to two months; thaw in fridge.
- Simple tricks for success: Chill dough, freeze before dipping, use a fork, and work in batches.
Last Updated on January 7, 2026 by Souhail
Let me tell you a little secret: the first time I made Oreo Balls, I didn’t expect them to be this good. I mean, how amazing could three simple ingredients be? But friends, these little chocolate-dipped gems are dangerously addictive. The rich, creamy center made from crushed Oreos and cream cheese gets coated in silky melted chocolate, creating a no-bake treat that’s perfect for everything from cozy nights in to impressing a holiday crowd.
Whether you’re short on time or just want to avoid turning on the oven, this Oreo Balls recipe has you covered. It’s one of those recipes that feels like cheating because it’s so easy, yet the results taste like you spent hours in the kitchen. They’re also super customizable—think sprinkles, crushed nuts, or a drizzle of white chocolate for flair.
These bite-sized beauties are creamy, chocolatey, crunchy (if you chill them just right), and deeply satisfying. And with just three main ingredients and no baking required, they might just become your new go-to sweet treat.
Table of contents
- Why You’ll Be Obsessed with These Oreo Balls
- How to Make Oreo Balls Recipe
- Little Tips That Make a Big Difference with Oreo Balls
- Fun Twists on Oreo Balls You’ll Want to Try
- Delicious Ways to Serve Oreo Balls
- How to Store and Reheat Oreo Balls (Not That You’ll Have Leftovers)
- Fun & Creative Ways to Use Oreo Balls
- Frequently Asked Questions
- Wrapping It Up – Why You’ve Gotta Try These
Why You’ll Be Obsessed with These Oreo Balls
Here’s the magic behind why this recipe is always a hit (and why people beg for it at every party):
- Just 3 Ingredients: Yep, that’s it. Oreos, cream cheese, and chocolate. You don’t need to be a pro baker for this one.
- No-Bake and Foolproof: There’s no oven involved, which means no worrying about overbaking or undercooking anything.
- Endless Customizations: Want to use golden Oreos? Add peppermint extract? Coat in white chocolate? Go wild. This recipe is your blank dessert canvas.
- Perfect for Gifting: These look fancy, but take hardly any time. Package them in a cute box and you’ve got a DIY gift that people actually want to eat.
- Kid-Friendly: Whether they’re helping crush the cookies or adding sprinkles, kids love to get involved—and eat the results!
Want to Customize It? Here Are Some Ideas:
- Vegan Option: Use a vegan cream cheese and dairy-free chocolate chips. Most store-brand chocolate sandwich cookies are accidentally vegan—just double check the label.
- Gluten-Free Version: Grab a gluten-free chocolate sandwich cookie, and make sure your chocolate and cream cheese are certified GF.
- Flavored Fillings: Add a splash of vanilla extract, peppermint extract, or even espresso powder to the Oreo-cream cheese mixture for a twist.
- Decorate Like a Pro: Use crushed candy canes, cookie crumbles, chopped nuts, or even edible glitter for a festive look.
How to Make Oreo Balls Recipe

Oreo Balls Recipe
These no-bake Oreo Balls are creamy, chocolatey, and totally addictive. Made with just 3 simple ingredients, they’re perfect for holidays, parties, or any time you’re craving a bite-sized dessert.
24
servings30
minutes140
kcalKeep the screen of your device on
Ingredients
36 Oreo cookies (1 standard package)
226 g (8 oz) cream cheese, softened
340 g (12 oz) semi-sweet or white chocolate, for coating
Directions
- First, grab a full pack of Oreo cookies. You don’t need to scrape out the filling—just toss the whole cookies into a food processor and pulse until you’ve got fine crumbs. If you don’t have a food processor, no worries! Just put the cookies in a zip-top bag and crush them with a rolling pin until you get a sand-like texture.
- Then, mix those Oreo crumbs with softened cream cheese. I like to use the back of a spoon or a hand mixer until the mixture is completely smooth and dark like rich chocolate fudge. This is your Oreo truffle base.
- Once that’s all combined, pop the bowl into the fridge for about 20–30 minutes. This helps firm up the mixture and makes it way easier to roll into balls. After chilling, scoop out the mixture and roll it into 1-inch balls. I like to use a small cookie scoop to keep them all the same size, but a spoon and your hands work just fine too.
- Line a tray with parchment paper and place the Oreo balls on it. Then, transfer the tray to the freezer for about 15–20 minutes so they don’t fall apart when dipping.
- Now comes the fun part—chocolate! Melt your choice of chocolate (semi-sweet, dark, or white) in the microwave in 30-second bursts, stirring each time until smooth. Dip each chilled Oreo ball into the melted chocolate, roll it around gently, then lift it out with a fork and tap off the excess.
- Set each dipped ball back onto the parchment paper and let them set. You can add sprinkles, crushed Oreos, or a chocolate drizzle right away before the coating hardens.
- Once they’ve fully set (usually within 20–30 minutes at room temp or faster in the fridge), they’re ready to eat!
Notes
- Don’t skip the chilling steps—it makes the rolling and dipping much easier.
- For a pretty finish, drizzle contrasting chocolate (white over dark, or vice versa) over the top after the first coating sets.
- You can store these in the fridge for up to 2 weeks or freeze for up to 2 months.
- Use flavored Oreos for fun twists—like Mint or Peanut Butter!
- Add a pinch of salt or a drop of vanilla extract to enhance the flavor.
- Avoid over-melting chocolate; stir often to keep it smooth.
Nutrition Facts
- Calories: 140kcal
- Fat: 8g
- Saturated Fat: 4g
- Sodium: 75mg
- Carbohydrates: 15g
- Fiber: 0.5g
- Sugar: 12g
- Protein: 1g
Like this recipe?
Follow @wikitasty on Pinterest
Little Tips That Make a Big Difference with Oreo Balls
Let’s be honest—Oreo Balls are simple. But here are some tricks I’ve picked up to make them even better:
- Chill the Dough: After mixing the Oreos and cream cheese, pop the mixture in the fridge for 20–30 minutes before rolling. It makes shaping the balls way easier (and less messy).
- Don’t Skip the Freezer Time: Once you’ve rolled the balls, freeze them for at least 15–20 minutes before dipping. This keeps them from falling apart in the melted chocolate.
- Use a Fork for Dipping: Drop the ball into the chocolate, roll it gently, then lift with a fork and tap off the excess. It gives you a smooth, even coating.
- Double Dip for Drama: Want a thicker chocolate shell? Dip once, let it set, then dip again. Bonus points for contrasting colors like white chocolate over dark.
- Work in Batches: Keep half the balls in the freezer while dipping the other half so they stay firm.
Fun Twists on Oreo Balls You’ll Want to Try
Once you’ve mastered the classic version, the possibilities are endless! Here are some delicious variations to spice things up:
1. Mint Chocolate Oreo Balls
Swap regular Oreos with Mint Oreos and add a drop of peppermint extract to the mix. Dip in dark chocolate and top with crushed candy canes or green sprinkles—perfect for the holidays.
2. Golden Oreo Cheesecake Balls
Use Golden Oreos and a touch of vanilla extract for a lighter, cheesecake-like flavor. Dip in white chocolate and drizzle with melted milk chocolate for contrast. This one pairs so well with your Biscoff Cheesecake for a dessert platter!
3. Peanut Butter Oreo Balls
Add 2 tablespoons of creamy peanut butter to the mixture before rolling. Dip in milk chocolate and top with crushed peanuts or a peanut butter drizzle. Think Reese’s, but better.
4. Spiced Oreo Balls
Mix in a pinch of cinnamon, nutmeg, or even pumpkin spice with the Oreo crumbs. Dip in white chocolate and finish with a sprinkle of cinnamon sugar. Great for fall or cozy winter treats.
5. Oreo Truffle Pops
Stick a lollipop stick into each ball before freezing, then dip and decorate like cake pops. These are adorable for birthdays, baby showers, or any festive gathering.
Delicious Ways to Serve Oreo Balls
Oreo Balls are cute, portable, and crowd-pleasing—which makes them ideal for just about any occasion. Here’s how I love to serve them:
- On a dessert board alongside fresh berries, chocolates, and treats like your Oreo Mug Cake for a chocolate-themed platter.
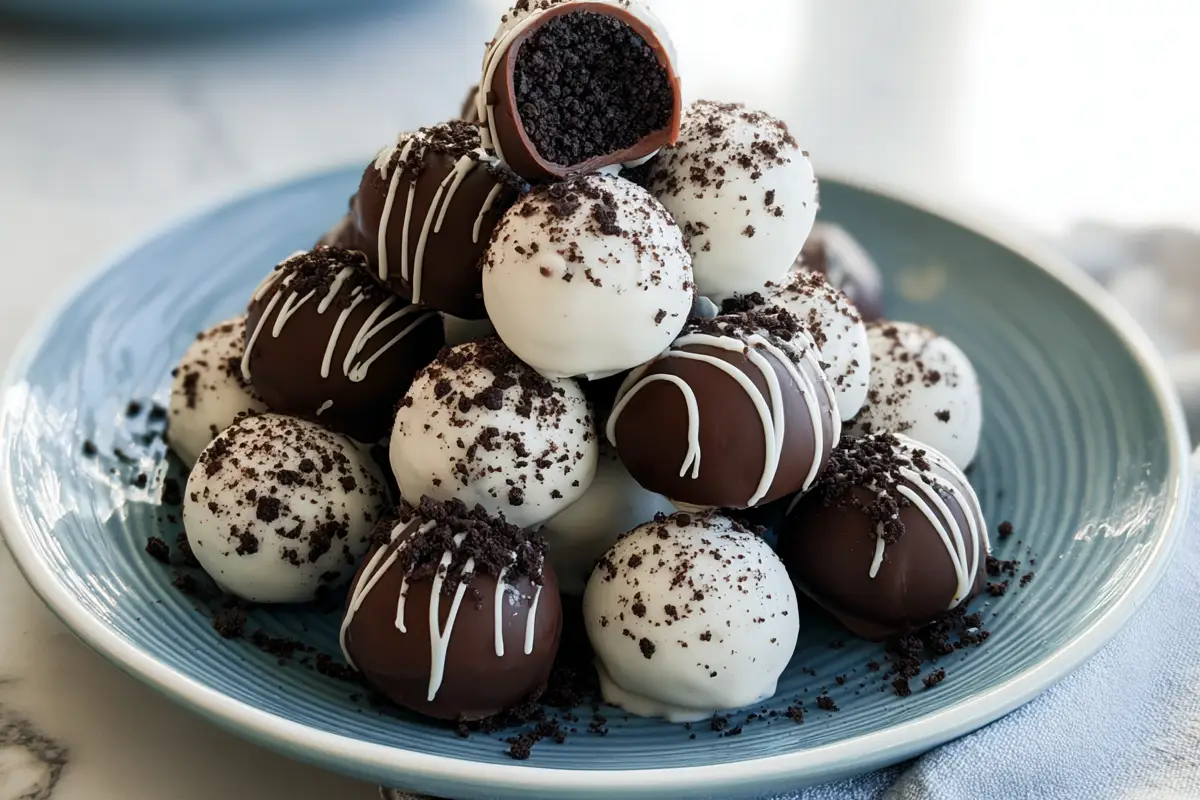
- Stacked like truffles in a pyramid on a serving plate with a sprinkle of powdered sugar for drama.
- In mini cupcake liners to keep fingers clean and give them a polished, gift-worthy look.
- With coffee or hot chocolate for the ultimate cozy combo (try them with a warm drink and thank me later).
How to Store and Reheat Oreo Balls (Not That You’ll Have Leftovers)
If you somehow resist eating them all at once, here’s how to keep them fresh:
- Refrigerator: Store in an airtight container for up to 2 weeks. Keep them chilled so the chocolate stays firm.
- Freezer: Oreo Balls freeze beautifully! Just layer them in a container with parchment paper between layers and freeze for up to 2 months. Thaw in the fridge overnight before serving.
- Reheating: You don’t need to reheat these (they’re meant to be cold or room temp), but if you prefer a softer center, let them sit at room temp for 10 minutes before serving.
Fun & Creative Ways to Use Oreo Balls
These little treats are so versatile! Here are some playful and delicious ways to work them into other ideas:
- Crush and sprinkle over ice cream or milkshakes for an over-the-top dessert.
- Slice in half and use to top cupcakes or brownies for a gourmet bakery-style look.
- Tuck into lunchboxes or party favor bags for a sweet surprise.
- Use as a cake topper for a no-fuss decoration that doubles as a treat.
- Turn them into reindeer, snowmen, or Halloween monsters with a little icing and candy eyes—great for kids’ parties.
Frequently Asked Questions
Absolutely! Just crush the Oreos in a zip-top bag using a rolling pin or heavy pan. It takes a little more effort but works great.
They’re probably too soft. Make sure to freeze the balls for at least 15–20 minutes before dipping to help them hold their shape.
Yes. Because they contain cream cheese, they should be kept in the fridge until serving. You can also freeze them for longer storage.
Totally! Golden Oreos, Mint, Peanut Butter, even seasonal varieties work. Just keep the rest of the recipe the same.
Tap off excess chocolate gently after dipping, and use a fork to let the excess drip off before placing the balls down.
Use high-quality baking chocolate or melting wafers. Chocolate chips can work, but they may need a bit of oil to smooth them out.
Wrapping It Up – Why You’ve Gotta Try These
Oreo Balls are the kind of recipe that checks all the boxes: easy, quick, fun, rich, and totally customizable. Whether you’re whipping up a late-night treat or prepping for a holiday dessert table, they fit the bill. And once you try them, you’ll find yourself making them for every occasion.
Love this recipe? You might also enjoy trying the Oreo Mug Cake when you need a single-serving chocolate fix or the Cheese Ball Recipe for a savory snack twist!