
Last Updated on May 6, 2025 by Souhail
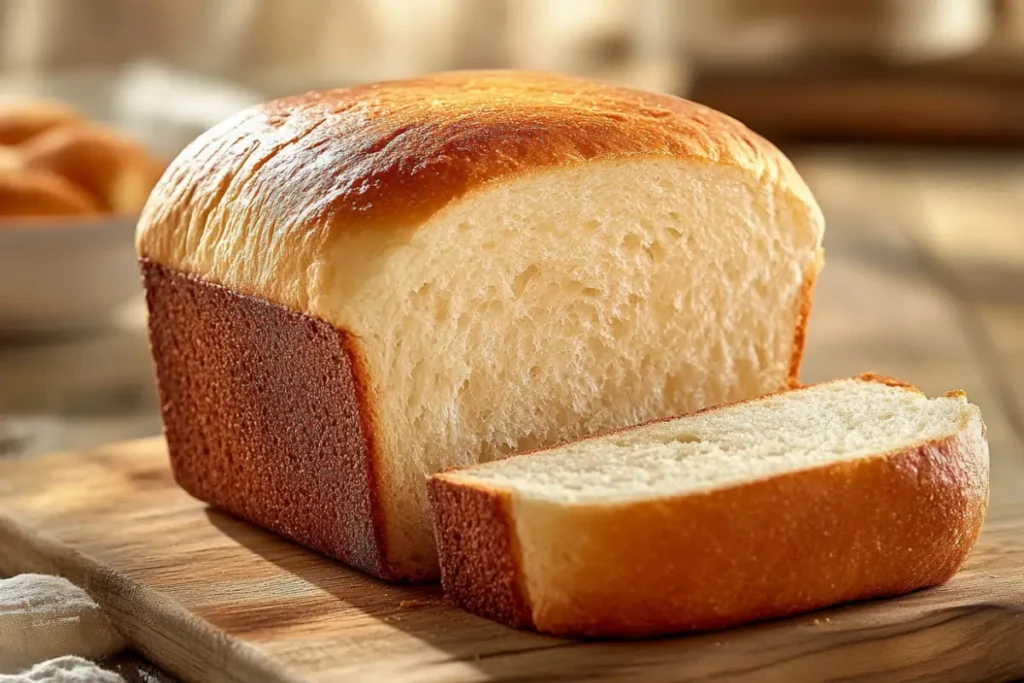
There’s just something extra satisfying about making your own sandwich bread, especially when it’s this soft, fluffy sourdough version. This sandwich bread recipe is super simple and gives you a loaf that’s perfect for everything from breakfast toast to stacked lunch sandwiches.
It’s got a light tang from the sourdough, a tender crumb, and that just-right texture that holds up to whatever you pile on. Plus, it’s way easier to make than you might think. Grab your ingredients, give it a little time, and you’ll have homemade bread that beats anything from the store.
Table of contents
Why This Sourdough Sandwich Bread Recipe Works
A great sourdough sandwich bread requires the perfect balance of ingredients, fermentation, and baking techniques. This recipe stands out because it delivers:
1. A Softer Crumb with Sourdough Flavor
Traditional sourdough can be chewy and rustic, but this recipe gives you the best of both worlds. By incorporating a longer fermentation time and just the right hydration level, the bread develops a mild tangy flavor while maintaining a soft, sliceable texture.
2. No Commercial Yeast 100% Naturally Leavened
Unlike many “quick” sourdough sandwich bread recipes that add a little yeast for a boost, this one relies entirely on a wild yeast sourdough starter. This not only enhances the flavor but also makes the bread easier to digest due to the fermentation process breaking down gluten and phytic acid.
3. A Foolproof Process for Success
Even if you’re new to sourdough, this step-by-step guide ensures success. From mixing and kneading to fermentation and baking, each step is broken down with clear instructions, so you can feel confident in your sourdough journey.
4. Customization Options to Fit Your Preferences
This sandwich bread recipe allows for several adjustments, so you can tailor it to your liking:
- Flour choices: Try a mix of whole wheat and white flour for a heartier loaf.
- Sweetness levels: Add a touch of honey or maple syrup for a hint of sweetness.
- Seeds & grains: Sprinkle in flaxseeds, sunflower seeds, or oats for added texture.
5. Perfect for Any Use
Whether you need sandwich bread for school lunches, toast for breakfast, or simply a delicious loaf to enjoy with butter, this recipe delivers every time.
Now that you know why this recipe is a must-try, let’s get into the ingredients and step-by-step process to bake your own sourdough sandwich bread at home!
Ingredients Breakdown
This sourdough sandwich bread recipe uses simple yet essential ingredients to create a soft, flavorful, and well-structured loaf. Each ingredient plays a vital role in the final texture and taste.
Main Ingredients
- 2 cups (480g) active sourdough starter (100% hydration): The key to a successful rise and tangy flavor. Make sure your starter is active and bubbly before use.
- 3 ½ cups (420g) bread flour: A high-protein flour that helps develop a strong gluten network, resulting in a soft but structured loaf. You can substitute up to 25% with whole wheat flour for a heartier texture.
- 1 cup (240ml) warm water (about 90°F/32°C): Ensures the dough stays at an optimal temperature for fermentation.
- 2 tablespoons (30g) sugar: Adds a slight sweetness, aids fermentation, and improves the crust’s golden color.
- 1 ½ teaspoons (9g) salt: Strengthens gluten structure and enhances overall flavor.
- 2 tablespoons (28g) unsalted butter, softened: Provides richness and tenderness to the crumb.
Optional Add-Ins
- Honey instead of sugar: If you prefer a more natural sweetener, honey works beautifully.
- Seeds or nuts: Sunflower seeds, sesame seeds, or flaxseeds can add texture and nutrition.
- Oats: Sprinkling rolled oats on top gives a rustic, bakery-style appearance.
Step-by-Step Instructions
Baking sourdough sandwich bread recipe requires patience, but the process is straightforward. The long fermentation ensures a deep flavor and soft texture while keeping the bread light and fluffy.
1. Activate Your Starter (6-8 Hours Before Mixing Dough)
Before you start, make sure your sourdough starter is active. Feed it about 6-8 hours before using, ensuring it’s bubbly and has doubled in size. This will help your bread rise properly.
2. Mix the Dough
- In a large mixing bowl, combine the sourdough starter, warm water, and sugar. Stir well until fully mixed.
- Add the bread flour and mix until a rough, shaggy dough forms. Cover with a kitchen towel and let it rest for 30 minutes. This resting period (autolyse) allows the flour to absorb the water, making the dough easier to knead.
3. Knead the Dough
- Add the salt and softened butter to the dough.
- Knead for 8-10 minutes until the dough becomes smooth and elastic. You can do this by hand or use a stand mixer with a dough hook on medium speed.
- The dough should pull away from the sides of the bowl but still feel slightly sticky. If it’s too sticky, lightly flour your hands while kneading.
4. First Rise (Bulk Fermentation – 6-8 Hours at Room Temperature)
- Place the dough in a lightly greased bowl and cover it with a damp cloth.
- Let the dough rise at room temperature (21-23°C / 70-74°F) for 6-8 hours, or until it doubles in size.
- If your kitchen is cooler, fermentation may take a bit longer. If it’s warmer, check on the dough earlier.
5. Shape the Dough
- Lightly flour a clean surface and turn the dough onto it.
- Gently press the dough into a rectangle, then fold it into a tight loaf shape.
- Place the shaped dough seam-side down into a greased 9×5-inch loaf pan.
6. Second Rise (Proofing 3-4 Hours)
- Cover the pan loosely with a cloth and let the dough rise for 3-4 hours at room temperature.
- The dough is ready when it has risen about 1 inch above the rim of the pan. If you gently press it with your finger, the indentation should slowly spring back.
7. Preheat the Oven
About 30 minutes before baking, preheat your oven to 375°F (190°C). This ensures even baking and a golden crust.
8. Bake the Bread
- Place the loaf in the preheated oven and bake for 35-40 minutes.
- The bread is done when it has a deep golden brown crust and sounds hollow when tapped on the bottom. If you have a thermometer, the internal temperature should read 200-205°F (93-96°C).
9. Cool Completely Before Slicing
- Remove the bread from the oven and let it cool in the pan for 10 minutes.
- Transfer to a wire rack and let it cool completely before slicing. Cutting too early can result in a gummy texture.
Pro Tips for Success for the Best Sandwich Bread Recipe
Baking sourdough sandwich bread is rewarding, but precision matters. Use these key tips for a soft, flavorful loaf:
Let It Cool
Rest at least 1 hour before slicing to avoid a gummy texture.
Keep Your Starter Strong
Feed it 6–8 hours before baking. Keep it warm (75–80°F / 24–27°C) and feed regularly (2–3x/week).
Adjust Water for Flour Type
Add water a tablespoon at a time if dough feels dry; aim for slightly sticky but workable.
Knead Just Right
Stop when dough is smooth, elastic, and passes the windowpane test.
Mind Fermentation Time
Cool temps = slower rise (up to 10 hrs), warm temps = faster (around 6 hrs). For deeper flavor, refrigerate overnight.
Shape with Care
Flatten dough, roll tightly, tuck edges, and place seam-side down in the pan.
Second Rise Matters
Use the poke test: if it springs back slowly, it’s ready to bake.
Bake Precisely
Check oven temp (375°F/190°C). Tent with foil if browning too fast. Brush with butter after baking for softness.
Storage
Store your sourdough sandwich bread in a bread box, sealed plastic bag, or wrapped in a clean cloth at room temperature for up to 3 days. For longer storage, slice the bread and freeze in a freezer-safe bag for up to 3 months. Reheat slices in the toaster or oven for a fresh taste.
Variants
- Whole Wheat Sourdough Sandwich Bread Recipe : Replace half the bread flour with whole wheat flour.
- Herb Sourdough Bread: Add 1 tablespoon of dried herbs (like rosemary, thyme, or oregano) to the dough.
- Cheese and Jalapeño Sourdough Bread: Mix in 1 cup of grated cheese and 1/4 cup diced jalapeños.
- Sweet Sourdough Bread: Add 2 tablespoons of honey and 1/2 cup of raisins or dried cranberries.

Sandwich Bread Recipe
This sourdough sandwich bread recipe yields a soft, fluffy loaf with a mildly tangy flavor, perfect for sandwiches or toast. It requires a bit of planning for the dough to ferment but results in a delicious homemade loaf that’s worth the effort.
12
servings25
minutes40
minutes130
kcal12-14
hoursKeep the screen of your device on
Ingredients
2 cups (480g) active sourdough starter (100% hydration)
3 ½ cups (420g) bread flour
1 cup (240ml) warm water (about 90°F/32°C)
2 tablespoons (30g) sugar
1 ½ teaspoons (9g) salt
2 tablespoons (28g) unsalted butter, softened
Directions
- Activate Starter: Ensure your sourdough starter is active and bubbly. Feed it 6-8 hours before you start.
- Mix Dough: In a large mixing bowl, combine the sourdough starter, warm water, and sugar. Stir well. Add the bread flour and mix until a rough dough forms.
- Knead Dough: Add salt and butter, kneading the dough for 8-10 minutes until smooth and elastic. The dough should pull away from the sides of the bowl but still be slightly sticky.
- First Rise (Bulk Fermentation): Cover the bowl with a damp cloth and let the dough rise for 6-8 hours at room temperature or until doubled in size.
- Shape Dough: Turn the dough onto a lightly floured surface and shape it into a loaf. Place the shaped dough in a greased 9×5-inch loaf pan.
- Second Rise: Cover the pan loosely with a cloth and let the dough rise for 3-4 hours, or until it has risen about an inch above the rim of the pan.
- Preheat Oven: Preheat your oven to 375°F (190°C).
- Bake Bread: Bake the loaf for 35-40 minutes, or until it reaches a deep golden brown color and sounds hollow when tapped on the bottom.
- Cool Completely: Allow the bread to cool in the pan for 10 minutes, then transfer it to a wire rack to cool completely before slicing.
Notes
- Make sure the sourdough starter is active for the best rise.
- Use bread flour instead of all-purpose flour for better gluten development.
- Allow enough time for the dough to ferment and develop flavor.
Like this recipe?
Follow @wikitasty on Pinterest
Frequently Asked Questions (FAQ)
Yes, but the bread may be slightly less chewy and have a softer texture.
The starter may not have been active enough. Make sure it’s bubbly and has doubled in size before using.
Absolutely! Feel free to add seeds, nuts, dried fruits, or herbs to customize the flavor.
The loaf should be golden brown, and it should sound hollow when tapped on the bottom. The internal temperature should reach 190°F (88°C).
Final Thoughts
Baking your own sourdough sandwich bread is a rewarding experience that brings both delicious flavors and health benefits to your table. With its soft crumb, slight tang, and perfect texture for sandwiches or toast, this bread is a staple you’ll want to make again and again. By following the right fermentation process and using a well-fed sourdough starter, you can create a beautifully risen loaf that surpasses store-bought options.
If you’re interested in exploring other homemade bread alternatives, you might enjoy learning about sweet potatoes as a substitute for bread. For those who love baking but want to experiment with different ingredients, using kefir in baking can offer unique flavors and textures.
Looking to pair your fresh-baked sourdough bread with a hearty meal? Discover the secret to making the perfect soup to serve alongside your loaf. If you’re a fan of classic pastries, you might also enjoy reading about the key differences between French and New Orleans-style beignets, another delicious homemade treat.
I hope this sourdough sandwich bread recipe becomes a go-to in your kitchen. Have you tried making it? Share your experience in the comments below or in social media! Happy baking!