
- Soft, buttery sugar cookies with slight edge snap that melt in your mouth, perfect for spring showers.
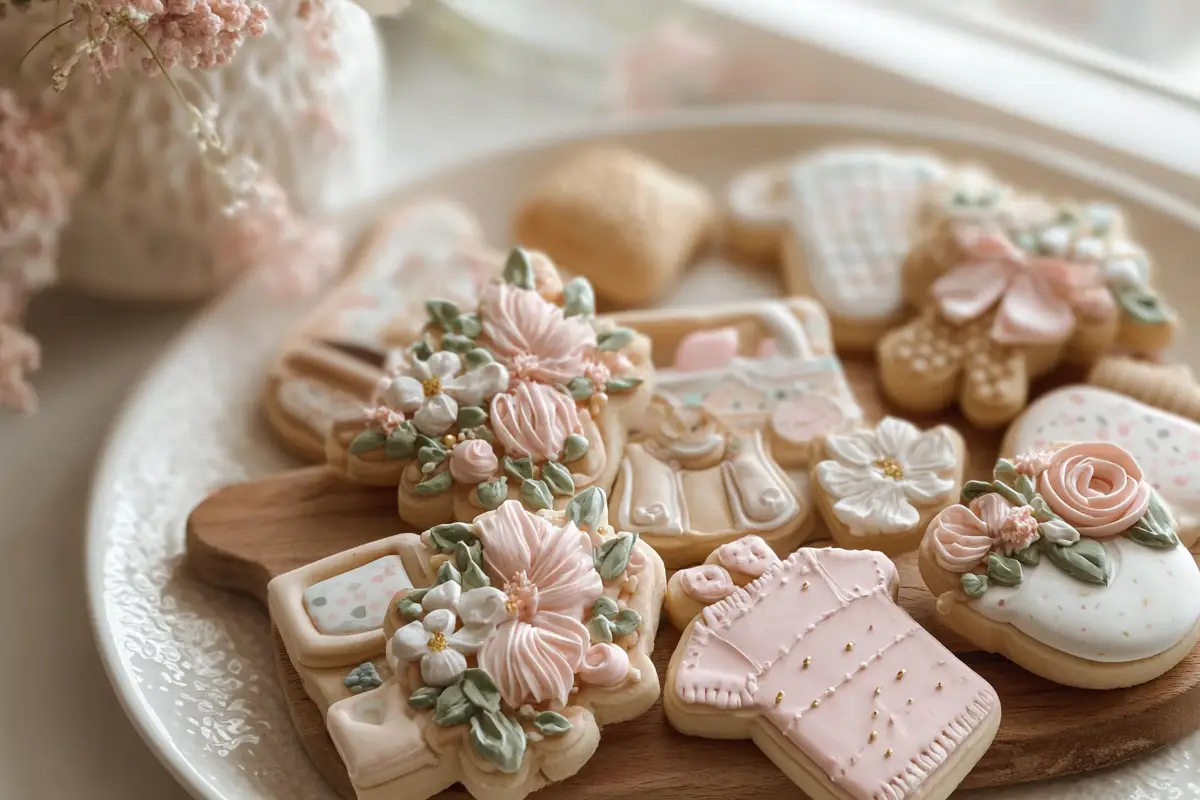
- Pastel royal icing with piped floral designs makes them elegant edible keepsakes and giftable favors.
- Make-ahead friendly: dough, cookies, and icing can be prepped in advance to reduce decorating stress.
- Decorating tips: chill dough, use two royal icing consistencies, dry between layers, and use gel coloring.
- Versatile variations and uses: flavor twists, painted or pressed florals, toppers, favors, or decorating kits.
Last Updated on February 3, 2026 by Kenza
There’s something magical about celebrating new life, especially when it’s wrapped in the soft pastels, sweet scents, and delicate joy of a springtime baby shower. That’s where these Baby in Bloom Cookies come in—beautifully decorated, melt-in-your-mouth sugar cookies that feel as special as the moment they’re made for. The keyphrase “baby in bloom cookies” fits right in here, because honestly, can you think of anything more perfect for a floral baby shower?
I first made a batch of these for my cousin’s garden-themed baby shower in Brooklyn last May, and let me tell you—they disappeared faster than the mimosa bar could refill. Guests were actually pocketing extras “for later.” These cookies are buttery and soft with just the right snap at the edge, finished with pastel royal icing and edible floral designs that make them look almost too pretty to eat. (Almost.) They’re ideal for gifting, decorating with friends, or simply stealing a moment of zen in your kitchen with a piping bag and podcast.
Table of contents
- Why You’ll Absolutely Love These Baby in Bloom Cookies
- How to Make Baby in Bloom Cookies
- My Go-To Tips for Making Bloom-Themed Cookies Beautiful and Delicious
- Fun Ways to Switch Up These Baby in Bloom Cookies
- Serving Ideas to Make These Cookies the Star of the Table
- How to Store and Reheat (Though Honestly, They’ll Be Gone Fast!)
- Fun and Creative Ways to Reuse Baby in Bloom Cookies
- FAQs About Baby in Bloom Cookies
- Let’s Wrap It Up!
Why You’ll Absolutely Love These Baby in Bloom Cookies
These aren’t just cookies—they’re edible keepsakes, the kind that draw “awws” before anyone even takes a bite. Here’s what makes them a total hit:
- Soft and Buttery Texture: These cookies are tender, just slightly crisp around the edges, and practically melt in your mouth—thanks to the perfect sugar cookie base. (If you’re craving a versatile base recipe, I also love this classic sugar cookie recipe.)
- Gorgeous Floral Design: Inspired by spring blooms and baby shower elegance, these cookies feature pastel royal icing, piped florals, and sometimes a touch of gold dust for that “wow” factor.
- Make-Ahead Friendly: You can prep the cookies and even the royal icing in advance, so decorating day is all about creativity—not stress.
- Customizable for Any Occasion: Swap out the colors to fit different themes—pink peonies, baby blue buds, lavender lilacs… you name it!
- Great for Gifting: Pack them in cellophane bags or small cookie boxes for take-home favors your guests will swoon over.
Gluten-free or vegan? You can make swaps like using a plant-based butter and egg substitute, or a gluten-free all-purpose flour mix. I’ll share a few of my favorite twists in the next section.
How to Make Baby in Bloom Cookies
Baby in Bloom Cookies Recipe
24
servings45
minutes10
minutes165
kcalKeep the screen of your device on
Ingredients
- For the Cookies:
1 cup unsalted butter, softened
1 cup granulated sugar
1 large egg
1.5 tsp vanilla extract
2.75 cups all-purpose flour
0.5 tsp baking powder
0.25 tsp salt
- For the Royal Icing:
3 cups powdered sugar, sifted
2 tbsp meringue powder
5 –6 tbsp warm water (plus more for thinning)
Gel food coloring (pastel shades)
Directions
- Start by making the cookie dough. I like to use softened butter—just slightly cool to the touch, not melty. Cream it with sugar until it’s fluffy and pale. This is key for that soft bite and delicate crumb. Add your egg and a splash of vanilla (or almond extract if you want a bakery-style flavor). Mix until smooth.
- Next, whisk your dry ingredients together—flour, baking powder, and a pinch of salt. Slowly add the dry mix to the butter mixture. It might look a little crumbly at first, but it’ll come together into a smooth, pliable dough.
- Once the dough is ready, divide it into two disks, wrap them in plastic, and chill for about 30 minutes. This makes the dough easier to roll and helps prevent spreading in the oven.
- After chilling, roll the dough out to ¼ inch thick. Use floral or onesie-shaped cookie cutters for that classic baby shower look. Place them on a parchment-lined baking sheet and chill again briefly—just 10–15 minutes—before baking at 350°F until the edges are lightly golden (about 9–11 minutes).
- While the cookies cool completely, prep your royal icing. You’ll want two consistencies: one thick for outlining and piping petals, and one thinner for flooding the cookies. Use gel food coloring to tint your icing soft pastels—think blush pink, mint green, lilac, or butter yellow.
- Outline your cookies, let that set for a few minutes, then fill them in with the thinner icing. Once the base is dry (a few hours or overnight is best), decorate with piped flowers, leaves, and optional gold dust or edible pearls. Let everything dry before packing or stacking.
- Decorating tip: Make it a group activity! I once hosted a cookie-decorating station at a baby shower and it was a total hit.
Notes
- You can use almond extract for a more bakery-style flavor.
- Always chill your cutouts before baking to help them hold their shape.
- Let royal icing dry fully (up to overnight) before stacking cookies.
- Practice piping flowers on parchment paper before decorating your cookies.
- Use a scribe tool or toothpick to help spread flood icing evenly.
Nutrition Facts
- Calories: 165kcal
- Fat: 7g
- Sodium: 42mg
- Carbohydrates: 24g
- Fiber: 0.4g
- Sugar: 15g
- Protein: 1g
Like this recipe?
Follow @wikitasty on Pinterest
My Go-To Tips for Making Bloom-Themed Cookies Beautiful and Delicious
Baking cookies is one thing—but decorating them to look like a spring garden? That takes a little know-how. Here are my favorite tips to help you succeed (and have fun while doing it!):
- Chill the Dough Before Cutting: Pop the dough in the fridge for 30 minutes before rolling and cutting—it helps the cookies keep their shape and bake evenly.
- Roll Evenly: Use rolling pin guides or wooden dowels to keep your dough about ¼-inch thick throughout. This gives you soft, sturdy cookies that are easy to decorate.
- Royal Icing Consistency Matters: You’ll want two consistencies—piping (thicker) for outlines and details, and flooding (thinner) to fill the cookies. Add water a few drops at a time until you get it just right.
- Dry Between Layers: Let your base icing dry completely before adding floral layers or accents. This keeps your details sharp and prevents bleeding colors.
- Use Gel Food Coloring: Liquid food coloring can water down your icing. Gel gives you vibrant color without compromising consistency.
- Practice Before Decorating: If you’re nervous about piping flowers, try practicing on parchment paper first!
Fun Ways to Switch Up These Baby in Bloom Cookies
Once you’ve mastered the basics, the possibilities blossom (pun totally intended!). Here are a few creative twists you can try:
1. Lavender & Lemon Sugar Cookies
Add a teaspoon of dried culinary lavender and zest of one lemon to your dough. It gives your cookies a beautiful, subtly floral aroma that pairs so well with spring themes.
2. Vanilla Bean & Almond
Swap out plain vanilla extract for vanilla bean paste and a dash of almond extract. The result is aromatic and elegant—especially perfect for fancy events.
3. Pastel Ombre Icing
Instead of one icing color, create an ombre effect across your batch. You can do it with a piping bag loaded with multiple colors, or by swirling two colors together when flooding.
4. Painted Floral Cookies
If you love watercolor painting, try mixing edible food coloring with a bit of vodka or lemon extract and painting florals directly onto the dry royal icing.
5. Add Edible Flowers
Press tiny dried edible blooms like violets or pansies into the wet icing for a stunning, natural look.
Serving Ideas to Make These Cookies the Star of the Table
Whether you’re hosting a garden-themed baby shower or bringing a treat to a friend’s celebration, these cookies deserve a sweet spotlight.
Set them on a vintage cake stand surrounded by flower petals, or display them in pastel gift boxes as personalized party favors. I also love adding a tiered tray of these next to bridal shower cupcakes or other seasonal cookies like homemade pumpkin cookies for a themed sweets table.
Pair them with a floral tea blend, rosé, or lemonade for the ultimate spring dessert spread.
How to Store and Reheat (Though Honestly, They’ll Be Gone Fast!)
These cookies store beautifully, which is ideal if you’re prepping in advance for a party.
- Room Temperature: Once the icing is fully set, store the cookies in an airtight container with parchment between layers. They’ll stay fresh for up to 5 days.
- Freeze for Later: You can freeze undecorated cookies for up to 3 months. Just thaw and decorate when you’re ready!
- Reheating Tips: These cookies don’t need reheating, but if you want to soften one slightly, 5 seconds in the microwave does the trick—just be careful not to melt the icing.
Fun and Creative Ways to Reuse Baby in Bloom Cookies
Got extras? These cookies can be more than just a treat:
- Gift Them in Baby Shower Favors: Wrap in clear bags tied with twine and a tiny bloom.
- Use as Cupcake Toppers: Place a mini cookie atop frosted peanut butter cupcakes for a dreamy duo.
- Decorate Baby Gift Boxes: Nestle one into a basket of baby gifts for an edible flourish.
- Turn into a Cookie Decorating Kit: Pack plain cookies, small icing bags, and sprinkles in a box for guests or kids to decorate their own.
FAQs About Baby in Bloom Cookies
Yes! Bake the cookies and decorate up to 3 days in advance. Store them in an airtight container once icing is completely dry.
Royal icing is ideal because it hardens beautifully and lets you layer details. You can adjust the consistency for outlining and flooding.
Chill the dough before rolling, and again after cutting the shapes. Use parchment paper and avoid overmixing the dough.
They stay fresh at room temp for 5 days, or can be frozen for up to 3 months.
You can use buttercream, but it won’t dry hard for stacking or transport. Royal icing gives that polished, professional finish.
Use gel food coloring—start with a tiny amount and build up slowly. A toothpick dip is often enough!
Let’s Wrap It Up!
I hope these baby in bloom cookies bring as much joy to your table as they have to mine. They’re a labor of love, yes—but absolutely worth every moment, especially when you see the smiles they bring. Whether you’re celebrating a new arrival or just want to bake something beautiful, these cookies are pure springtime magic.
If you give them a try, tag me on social—I’d love to see your creations! And if you’re looking for more cookie inspiration, check out these dreamy pumpkin chocolate chip cookies or classic peanut butter cookies next.
Happy baking and blooming, friends!